Auto Scaling: What it is, How it Works, and How to Implement it


For businesses large or small, Auto Scaling offers the ultimate solution to resource management and distribution.
Jatin sharma- senior developer at the firm took quite an exhaustive session on Auto Scaling that delivered both conceptual clarity and hands on experience. The session remained fruitful for all the participants and he also received a token of appreciation from our project manager. Here’s an outline:”
On 28 February 2017, almost every news outlet published a common headline- Amazon broke the Internet. Services like Instagram, Quora, Slack, American Airlines, and many others were all completely or partially inaccessible to a large number of users and while the mayhem lasted for only around four hours, it gave a rare glimpse into how robust and sophisticated the Internet has become. After all, applications facing downtime or crashing under high traffic used to be the norm and not something that made headlines. The credit for most part goes to auto scaling.
As you would guess, all those applications relied on the same cloud service provider- AWS. In fact, from Netflix and NASA to newborn startups, it powers a large chunk of the Internet and while it offers services across many categories, we are interested in its one particular service i.e. EC2 (Elastic Cloud Compute). In its most rudimentary form, they are servers larger than football fields that contain millions of resource instances that users can hire depending on their workload.
Now because the workload isn’t consistent, businesses struggle to determine their exact requirement. That’s where Auto Scaling steps in.
Auto Scaling
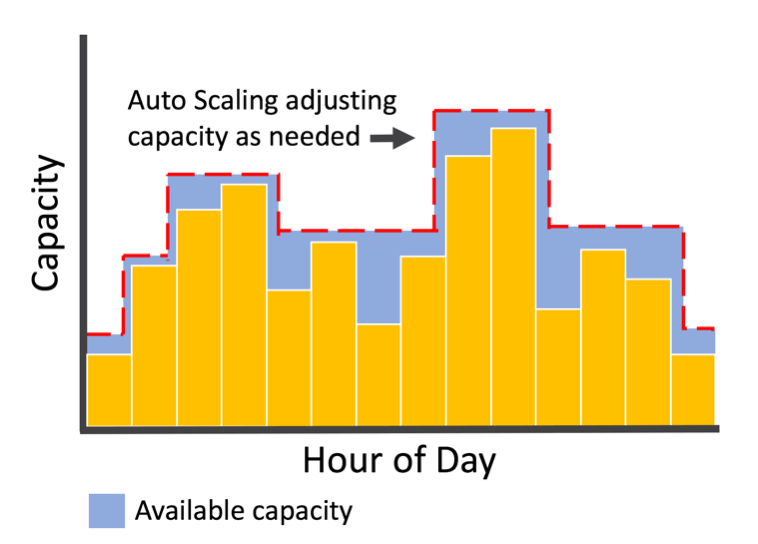
Computing resources are today cheaper than ever but they are still not free. Renting too little resources puts your application at risk under high traffic but renting too much is essentially paying for resources you would rarely use. This is precisely the problem that Auto Scaling solves. If you have large variations in your traffic, auto scaling offers the flexibility to add or remove capacity from your resource group in real-time as demand changes. Basically, you don’t need to think about traffic, just set the lower and upper threshold and the system will automatically manage the corresponding resources.
Depending on your needs, auto scaling can be setup to optimize performance or cost or both by deploying appropriate scaling plans, which we will discuss in a moment.
At point, the benefits of using auto scaling for any application are obvious:
- Optimum performance
- Optimum cost
- No scaling overheads
How auto scaling works
Auto scaling, instead of a feature, can be better understood as an automated process that takes into account three components- each which needs to be manually defined during the setup. The three components are:
- Auto Scaling Group
A group is essentially the collection of all the EC2 instances that your application is running on. All these instances share similar characteristics and thus are treated as a logical group for instance scaling and management. That is, when we talk about auto scaling, a group is the component that defines what to scale.
- Launch Configuration
Launch Configuration is the template that Scaling Groups use to launch EC2 instances. It contains all the information about needed instance including instance type, a key pair, one or more security groups, AMI ID, and a block device mapping.
One key factor worth mentioning here is that while you can use the same launch configuration for any number of scaling groups, any scaling group can only have only one launch configuration. Also, if you wish to change the launch configuration of a group, you would have to first setup the desired launch configuration and then start a group upon it. That is you can’t change launch configuration when instances are running.
In terms of the overall scheme, launch configuration defines what and how to scale.
- Auto scale plan
As mentioned earlier you can setup auto scaling to optimize performance, cost, or both. It is in this component where you set your preferences. For instance, if you have your application running on multiple instances, you can add more instances to boost performance, cut down instances to drive down costs, or set certain conditions to take care of both. It basically defines when and how to scale.
Depending on the type of application, you choose CPU utilization, Network utilization, Disk performance, Disk Reads/Writes, or a combination of them to set the benchmark for when instances should be created or terminated.
Consider we have an application with minimum instance = 1, maximum instance = 5, scale up when CPU utilization = 90% or more and scale down when CPU utilization = <10%.
In this case, the auto scaling group will start with 1 instance (we have not set desired instance) and as the CPU utilization clocks to 90%, it would create another instance and would continue to do so until it has 5 instances running. In the meanwhile, when/if the CPU utilization drops down to 10%, it starts terminating instances until there is only one instance left.
To ensure there are always required number of instances running, EC2 auto scaling periodically checks instance status to determine its health and take actions accordingly. You can also decide how these scaling policies take effect by opting for one of the three available options:
- Manual– you manually set the parameters at which scaling will be done.
- Based on schedule- scaling takes place at a pre-specified time.
- Based on demand- scaling takes place in response to demand.
How to Auto Scale
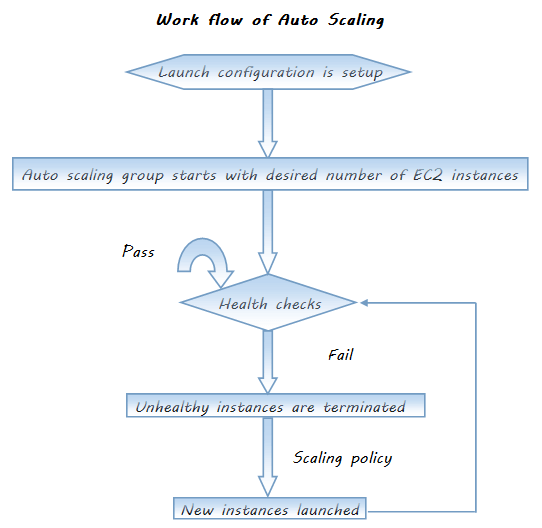
Now that we know what auto scaling is and how it works, let’s get down to how it is implemented. As you would have guessed by now, we will start by first creating a launch configuration, then creating an auto scaling group, and then check if our group has started with the prescribed number of instances.
Creating launch configuration
- Under navigation pane, Auto Scaling => Auto Scaling Groups => Create Auto Scaling group
- Login to your EC2 console and select a region
- Launch Configuration => Create a new launch configuration => Next
- Choose your desired AMI and instance type
- At this point you can also configure the name and IP address type => Review
- Choose Edit security groups => Review
- Choose Create launch configuration => Review
- Select an existing key pair or create a new key pair
- Choose Create launch configuration
Your launch configuration is created and you will be displayed a wizard to create Auto Scaling Group
Creating Auto Scaling Group
- Choose Configure Auto Scaling group details
- Enter Name and Size
- Select Network and Subnet => Next: Configure scaling policies
- Set you scaling policies => Next
- Choose Create Auto Scaling group => Close
Your Auto Scaling Group and policies are created. Now if you want to test if they are working as expected, you can follow these steps:
Verifying Auto Scaling Group
- On Instances tab, select ID of the instance you created.
- Actions => Instance State => Terminate => Yes, Terminate
- On navigation pane, Auto Scaling Groups => Select your Auto Scaling Group => Activity History
You will see a new instance running after the time you specified in Scaling policy. By default, it’s 300 seconds.
You can also choose Instances from navigation pane. It shows both terminated and running instances.