Create a Distribution Provisioning Profile to Jumpstart with iOS App Deployment

Let’s cut into iOS app development and deployment process, knowing what it means to sign code and provisioning an iOS profile!
iPhone developers need to create a provisioning profile to get their apps approved by Apple on the App Store. It is always advisable to complete all stages of SDLC till testing before sending it across to Apple App Store. A provisioning profile helps developers to run and test their applications on a physical device. A provisioning profile is downloaded from the Apple Developer account and embedded within the app bundle. All the devices specified in the provisioning profile can be used by developers whose iPhone development certificates are included in the profile.
What is Provisioning Profile?
A distribution provisioning profile is a combination of App Id and Distribution Certificates. It authorizes the app to make use of certain services (like push notifications) and ensure that the app is submitted by you. For the same reason distribution Certificates are tied to a specific Mac.
Assumption: This article elucidates the process involved in creating a provisioning profile and assumes that developers are aware of iOS development and Xcode.
What is the Need to Create Provisioning Profile?
iPhone App developers need to understand about code signing because there is the need to use it to run apps on real devices (own, or of clients or of customers or even on the app store!)
It is also important to reach a wider audience. A device is required to test the code properly. More reasons to test the code on a physical device:
- A device is usually slower – Devices are less capable than simulator. Physical devices are not as powerful, therefore the app must perform the way a developer wants to.
- It has far less memory – This is important in case of games, including large number of images and textures.
- There are some API’s that are device specific – Most of the in-app purchase API’s simply work on a physical device and things like core animation do not work.
Summing it, you haven’t tested it if you were not able to do it on a physical device!
Prerequisite for Setting up A iOS Provisioning Profile
- Must have an Apple Developer Account
- Adding a Device ID to Your Development Team
Steps to Setup a Xcode Provisioning Profile
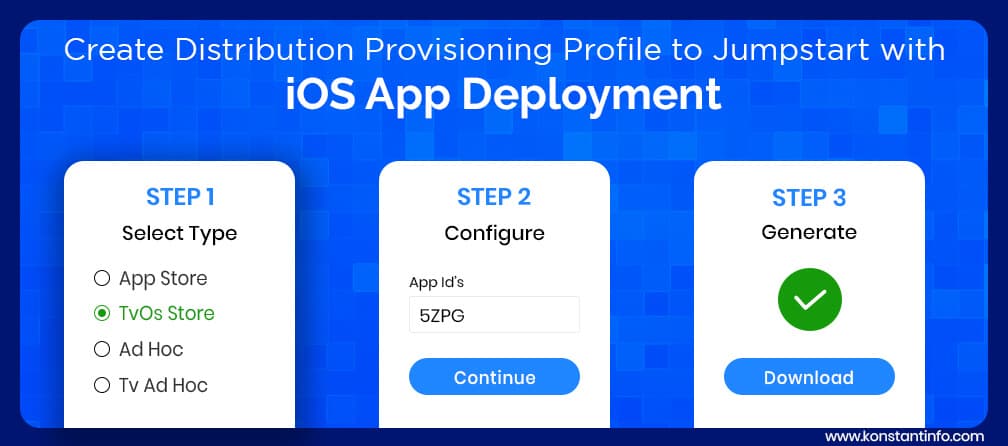
An App Store Distribution Provisioning Profile lets iPhone developers post their apps in the Apple App Store.
- Go to https://developer.apple.comand click on Account
- Login into the iOS provisioning portal
- Click provisioning in the sidebar.
- On the left tab under Provisioning Profiles, select Distribution
- Select the add button “+” at the top right to create a new profile
- Specify the name of the profile and click Generate. “Distribution” can be included in the name to help distinguish this one from testing. A matching provisioning profile name is also required while distributing the app to the app store. This helps identify and verify which developer account created the app.
- Select all the certificates you wish to include in this provisioning profile (the certificate the app was signed with), identifiers and devices that you want to associate with this profile. (The certificate is a public/private key-pair, which identifies who developed the app)
- Select “App Store” and press Continue
- Select App ID and press Continue
- Click to submit the profile.
iOS Team Provisioning Profile
Only iPhone developers and administrators are permitted to create provisioning profiles. It contains a name, development certificates, a set of device ID’s and an app ID. This helps tie developers and devices with the development team.
Validity of Apple Provisioning Profile
Such a profile once created remains valid for one year.
Things to Be Considered
While selecting devices and certificates, select the ones that the team will be using for testing. Certificates are required for developers working on the app.
In case the network administrator enables an app ID for Apple Push Notification service recently, a new provisioning profile containing that app ID must be created. The provisioning profiles created before an app ID is enabled for APNS, do not work for testing it. Soon after the team administrator creates this profile, the iPhone developers can download and install it on their devices and test their app.
Definitive Discussion
Many starting iOS App developers cower when they come across bundle identifiers, App ID’s, provisioning profiles or certificate signing requests. A lot of new and confusing technology jargon is involved and keeps emerging with every passing year. One who is unaware might be unsure of the processes. This blog reasons out the need, advantages, and validity of the provisioning profile. As we demystify the code signing process, we realize how various things fit into building an iOS app. It’s time to catch the big deal, follow our experts to know more!